
Please wait, I'm coming over...

Last Changed 5/8/2011 |
||
|
One thing we became used to with the motorhome Training Wheels was a rear view camera system. The system
eliminated the blind area immediately behind the coach. The Pace Arrow had a wide view system and was extremely
useful when passing a vehicle. The rear view system gave a definite view that we were ahead of the vehicle we were passing before we cut
back. |
||
Monitors |
||
 |
There will be two monitors eventually. We used a piece of 1/4" Lexan as the base of the monitor mount. We fabricated a pair of brackets from bar steel. The sun shield was cut from a plastic report folder. | |
 |
||
click on images to enlarge |
||
 |
||
 |
||
click on images to enlarge |
||
 |
The location of the monitors really do not interfere with the forward view anymore that if we installed a bug deflector on the hood. | |
click on images to enlarge |
||
 |
A view from outside in. | |
 |
||
click on images to enlarge |
||
Cameras |
||
 |
This is the DAOC Color Waterproof CCD IR Camera. We will use the
monitor reverse video to allow rearview usage. We found this camera
in KAWAMALL on eBay. The IR means that the camera has infrared capability to see at night. The camera captures available light for an image. One of the largest sources for this light is the taillights. |
|
click on images to enlarge |
||
The camera lens angle is 120º for a wide angle view to the rear. It also has a .33" CCD receptor for greater resolution. We used the same style camera on the back of the trailer. |
||
 |
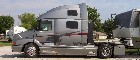
We mounted the truck rearview camera on the headache rack cabinet. Because of the wide-angle view of the camera, we get a good view of the hitch plate for hitching up the trailer. | |
|
|
||
click on images to enlarge |
||
 |
It is hard to take a photo of the image on the LCD monitor. We will try some more. | |
 |
You will note the trailer hitch near the bottom of the monitor. | |
click on images to enlarge |
||
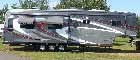
We plan on having two cameras. One is located on the headache rack cabinet mounted behind the cab of Red Rover. The other camera will be on the back of the trailer. The selected monitor has two video inputs to accommodate these cameras. One feature of the Pace Arrow's rear view system was a set of decals that were mounted on the screen of the monitor. One decal was calibrated in feet and the other in yards. They formed a inverted "V". When viewing the rear view monitor, the decals' "V" lined up with the roadway. The accuracy of the calibration was very good. We could back up to a post where the decal indicated we were 3' from the post and we actually were. We are not quite sure how we will be able to replicate this. We guess a sheet of clear covering for the LCD monitor and a set of lines created with a Sharpie may do the job. |
||
A Hitch CameraWe found a problem with hitching up. The hitch plate is black, the bed in black, the hitch well is black and the trailer pin is black. With everything black, it was hard to see things unless the light was just right. We added another camera just ahead and above the hitch. |
||
 |
We used a plastic conduit body for making a cover. We cut off the collar on the bottom of the body. We used a plastic plate to fill the bottom hole and to hold the camera. | |
 |
The camera fits inside the end collar which acts as a sun shield. The two filler pieces were glued in with 3M 5200 adhesive/caulk. | |
click on images to enlarge |
||
 |
A piece of aluminum bar stock was shaped as the stand. The body and stand was sprayed with bed liner. | |
click on images to enlarge |
||
This camera was feed into one of the video inputs of the monitor normally used for the computer. Since this camera is only used during hitch-up, that was not a problem. |
||
Possible FuturesRed Rover has powered mirrors and forward mounted wide view mirrors. Time will tell if more right side vision is necessary. Experience with Training Wheels proved that we could not run with the shades drawn on the window behind the passenger. Pulling out from angular streets just was not handled by the mirrors.If the need for more right vision is necessary, then we will mount another camera on the right mirror mount. We will run this camera direct to the monitor. We will then add a monitor switch between the camera on the back of Red Rover and the camera on the back of the trailer. Only one of these is needed at a time. |
||
Disclaimer: The information in this site is a collection of data we derived from the vendors and from our personal experiences. This information is meant as a learning guide for you to make your own decisions Best practices and code should always be followed. The recommendations we make are from our personal experiences and we do not receive any compensation for those recommendations. |